Self-hosted social infrastructure
Nostr Relay on AWS
Your relay. Your infrastructure.
Deploy your own Nostr relay through AWS Marketplace, with CloudWatch monitoring and optional automated backups. Keep your infrastructure in your AWS account.

Self-hosted social infrastructure
Your relay. Your infrastructure.
Deploy your own Nostr relay through AWS Marketplace, with CloudWatch monitoring and optional automated backups. Keep your infrastructure in your AWS account.
Capabilities
How it fits together
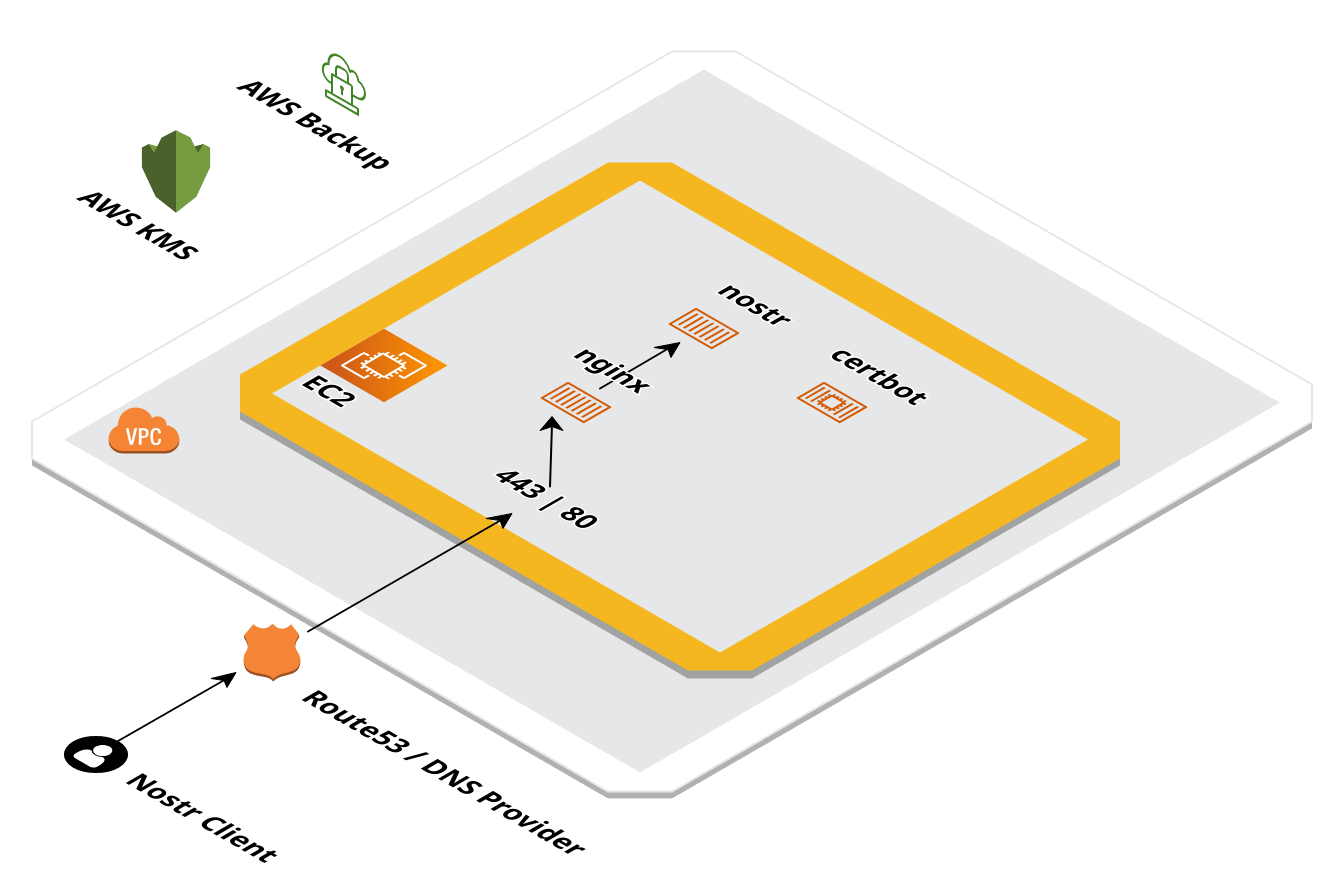
Our pricing is based on AWS infrastructure costs plus a small fee. You only pay for what you use.
We use nostr-rs-relay as the nostr server software. It's a high-performance Rust implementation of the Nostr protocol with SQLite storage, supporting key NIPs like NIP-01 (core protocol), NIP-05 (DNS identifiers), NIP-11 (relay information), NIP-42 (authentication), and more.
Yes, the CloudFormation template can be modified to suit your specific needs.
The relay can be deployed in any AWS region that supports the required services.
You can use any DNS provider you want. Just update the DNS record manually after launch and point the A record to the public instance IP address. The startup will wait until the dns resolves to it's IP before proceeding. The DomainName parameter in the CloudFormation must match the record you create.
Set the BackupsEnabled parameter to true when launching the CloudFormation stack. This will create an AWS Backup plan that takes daily backups at 5 AM UTC and retains them for 30 days. The backups are encrypted using a dedicated KMS key.
The CloudWatch console is automatically created and configured for your relay. You can view the logs in the CloudWatch console under Logs in the region where your relay is deployed. The log group will be /aws/ec2/nostr-relay. If you need startup logs, you'll have to log into the instance using SSM by right clicking on the instance in the EC2 console and clicking "connect". From there navigate to the /var/log/cloud-init-output.log to see what went wrong with the initial startup.
By default, SSH access is disabled for security (the default CIDR is 127.0.0.1/32). To enable SSH access, provide your IP CIDR block in the SSHIngressCidr parameter and specify an EC2 key pair in the KeyName parameter when launching. Alternatively, you can use AWS Systems Manager (SSM) to connect to your instance directly from the AWS Console without SSH.
You can control this with the DeletionPolicy parameter. Set it to "Retain" to keep your KMS keys and backup vault when the stack is deleted, or "Delete" to remove everything. This helps prevent accidental data loss while giving you control over cleanup.
Yes, if your AWS Systems Manager (SSM) service requires KMS encryption, you can provide your own KMS key ARN using the SSMKMSKeyArn parameter. This is optional - if you don't have KMS enabled on SSM (default AWS setting), you can leave this blank.
You can change the instance type by updating the InstanceType parameter in the CloudFormation stack. This will trigger a replacement instance with the new type. The new instance will be deployed in the same subnet and VPC as the original instance.
config.toml file for my relay?You can change the config.toml file by logging into the instance using SSM and editing the file at /opt/nostr/config/config.toml and running docker compose restart. You can find the config template here.
Built by KloudCover